Sunday 1 November 2015

inside and out

Paul is visiting for a few days so it was a perfect time to get the last ceiling beam in place.

Our last attempt was thwarted as it was too heavy for us to get into position to pre-drill the holes.

So I made a template of the bracket and hole positions and drilled the holes into the perpendicular beam that is already in place. (After checking and checking etc etc a zillion times as steel doesn't allow for errors of even a millimetre.)

Being too cheap to hire any type of mechanical lifting device, I knocked up an adjustable tripod in about an hour and a half and used this to support one end of the beam whilst the two of us focused on the tricky end.


 I found a use for all of my used cutting disks - as washers!


Once the tripod was in position, one of the "L" brackets was bolted in position, the beam hoisted over it and the second "L" brackets fitted and bolted in place. After I'd finished with the tripod it was dismantled so all the parts could be re-used.


Then back down at the other end the steel tube support post was put under the beam and welded in place:

So I now finally have a fully supported interior space.

How it will hopefully look (viewed from kitchen window):


It was a relief to get this part finished.

While I was inside doing the welding Paul offered to take my brand new (early Xmas present) lawnmower for a spin and he cleared around the veggie garden and made a path down to the dam. (The grass is already over knee height and I needed a clear path to take the water pump down to the dam every now and then.)


While he was mowing a path around the near edge of the dam he was suddenly shocked when a large red belly black snake shot out from under the mower and made off into the long grass. Fortunately the mower is on its highest setting so it escaped unscathed.

Rhubarb is coming along nicely:


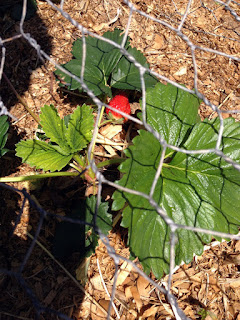
and I have just started collecting my first strawberries:


Quite exciting for someone who has never had their own garden let alone ever grown any of their own foodstuffs! I have also newly planted pumpkins (2 varieties), rocket, capsicums, beetroots and basil to go with the rhubarb, garlic, mint, strawberries and chives.

But now I must get cracking on the build again!

Monday 12 October 2015

tanked up

Spring has arrived with a vengeance with temperatures last week rivalling those of mid summer.

So with a growing veggy garden and a water supply more than 50 metres away (the dam) I needed to make watering the garden a little easier. So I bought an IBC 1000L water tank:


a petrol powered water pump:


and 70 metres of poly pipe:


and made myself a gravity fed water storage container at the head of the garden:


All that is left to do now is buy an adapter to connect a garden hose.

Already it has made watering the veggies so much easier.

My strawberries are already producing little fruits (a couple of more weeks before they are eatable.) The rhubarb and mint are doing nicely, the garlic should be ready in a few more weeks, and I have about 30 capsicums sprouts grown from seed on my verandah waiting for them to get a bit bigger before I transplant them.

Tomorrow I will plant about 20 pumpkin seeds.

 Also the warm weather has meant the thistles are springing up all over the place so I need to keep on top of them (ouch!) to stop them spreading. Already my efforts of the last 2 Springs have dramatically reduced their numbers.

Wednesday 30 September 2015

weld weary

With the engineers issue sorted and the steel cut it was time for me to weld all of the floor and roof steel plates into place.

I tackled the inside first:


There were about 40 of these @ 75x75x6mm. First I needed to run along with the angle grinder and grind off rust and paint. Then I moved onto the roof which needed around 54 pieces of 100x75x6mm plates. Once welded and wire brushed they were all given a coat of coldgal paint (galvanising spray paint.)


Also on the inside I was able to attach the right angle brackets I had made to the steel joist using high tensile bolts. I will probably run a weld around the bracket for extra strength before it is hoisted up and welded into place:


I will wait until Paul is visiting next to put it up - it's just a little unwieldy weighing in at about 72kg. It was difficult enough carrying it from one end of the containers to the other on my own. I don't fancy trying to hoist it up above my head.

Despite having finished all of the tussock spraying I am back out again with the weed spray as it is prime thistle season and the dreaded saffron thistle is rearing it's pretty but obnoxious head!!


Have to be a little more careful now - ran into this little fella (red bellied black snake) the other day while out spraying - he was no trouble as he was quietly warming himself in the early Spring sunshine:

Wednesday 23 September 2015

tussock tussle

With the latest holdup from the engineers sorted I am now waiting for the metal merchants to cut 6mm flat bar into about 80 or so pieces which I can use to weld between the containers on the floor and roof. With a guillotine it should only take them an hour or less. Considerably longer if I tried myself with a cutting blade on my grinder.

So I used the time to start spot spraying my Serrated Tussock grass per the instructions from the council. It was the only mandatory requirement from the weeds and pests inspector.

Tussock is all the light straw coloured clumps in the following photos:


I estimated that about 60% of my 25 acres (10.1Ha) needed spot spraying because of things like the rocks, dam, trees, road, tanks, plantings etc getting in the way. I had a boom sprayer quote for the rest.

So spending several hours each day with my sprayer after a couple of weeks I had covered all the territory I needed to do by hand.


But one of the things that the boom sprayer does is obliterate all greenery on the areas he sprays - everything dies and you're left with bare earth. And the problem with that is one of the first things to come back in the bare soil is thistle. Which then necessitates further spraying.

So I then decided I was going to spot spray the rest of the property.

Which I did.

Tussock after poisoning:


While out there I also covered my strawberry plants with mulch and used some spare chicken wire from a dismantled paddock fence to cover them up:


Current status: itching to get back to the build!!

Sunday 13 September 2015

wombat worry

In case some of you out there in cyberland were concerned about the plight of the Tondelver House wombat(s), I can relieve your anxiety by letting you know at least 3 of the four wombat burrows have been reoccupied.

Also my 'wombat-porn' spy camera caught this laddie/lassie the other night wandering up around the garden:

And he/she looks to be mange free which is a relief.

The camera has also picked up (apart from lots of roos) what seems to be a fox which has appeared on several nights:


And a show off duck giving me his 'best side':


A lovely neighbour has given me access to horse manure which has gone around the rhubarbs. She also very kindly gave me about 14 strawberry plants which have just gone in and need some mulch around them. I will be doing some more soil conditioning over the next few weeks.

Paul doing some 'muckraking':


And strawberries prior to mulching:


Progress on the build was held up for a couple of weeks by engineering issues again - they have been resolved (for the time being!) so I can get back to some interior welding.

One of the three beams has been welded in position, with the other two (a 'T' bar configuration) awaiting the manufacture of two right angle steel brackets to join them together)

Beam up Scotty:


Wednesday 26 August 2015

what's not to love?

Turning briefly to the fauna aspect of my land and building saga, I recently joined up to WomSAT - a new resource for communities to record sightings of wombats across the country and became a 'Wombat Warrior'!!

Wombats are facing a crisis which threatens their numbers and existence. Namely - Sarcoptes scabiei caused by a mite similar to scabies in humans. Some think it is spread by foxes (which can frequent wombat holes) as Wombats are fairly solitary and territorial which would lessen the chances of the spread of the scabies mite.

Their numbers are already under pressure due to encroaching development on their territory, attacks from dogs and foxes and harsh treatment from landowners who are not adverse to shooting them because they like to dig holes in fences and dam walls. 

Heaven forbid a landowner should have to go out of his way to mitigate damage by trying alternate methods of deterring wombat activity. No no no - much easier to just shoot them.

WomSAT is harnessing community support to record wombat sightings, burrows, live and dead wombats and any evidence of mange thereon, in an effort to gauge the effect of this scourge on wombat numbers.

There is a treatment available which can reverse the effects. 

I have 4 wombat holes on my property but I am still as yet uncertain as to which ones are still active. (Wombats can make more than one burrow.)

I haven't stayed late at my property and as wombats are nocturnal, I haven't seen any of them myself yet.

But evidence is there that it/they are wandering around.

Wombats poo is curiously cube shaped. And they like to deposit it on any raised surface like rocks and stones as a territorial marker. It is thought it is cube shaped to stop it rolling off. And I've found it all over my 25 acres of land.

As an early birthday present to myself I have just bought a motion detector wildlife camera which I will set up to photograph any wildlife that wanders past it. This way I can try and determine how many wombats are here and their relative state of health.

Wombats as they should be (I DARE you not to adore them!!):

And what the mange will do:

We had over 100mm of rain in the last 36 hours and so I went out today to see what it has done.

Apart from filling up my dam to overflowing, it has also flooded three of four of the wombat holes. I have been told that wombats dig down first and then up to form a chamber above any water that might creep in. Let's hope so!


I certainly hope they are ok.


Monday 13 July 2015

inner space

Alas yesterday my angle grinder bit the dust. When I first moved here 2 and a half years ago my first ever visit to an Aldi store I went in to get bread, eggs and cheese and came out with an angle grinder. (Aldi is dangerous that way)

I thought at $29 it might last 6 months and do some of the preliminary light jobs until I could decide on a proper one. Well bless its little heart - it has done everything so far, foundation tube cutting, all of the pre and post welding clean up and every wall panel cut-out bar the final 4.

And what finally stopped it wasn't the motor (around 1140W) but the little button on the wheel locking mechanism to tighten the disks gave way.

So I now have a Bosch. Nice and light, slimmer body so easier to hold. The Aldi one is still useable but changing a disk is a lot fiddlier and time consuming now.

And FINALLY - the last of the wall panels have been removed.


(Blue posts are temporary props until the 2 x 7M beams go up.)

Also - the ducks are back! Most days now they are on and around my dam.
There were 14 there today. I sat within 15 metres of them having my lunch and they were quite unperturbed.

Wednesday 8 July 2015

cutting corners

Another tricky bit of cutting with the angle grinder came next.

After the two corner posts were removed (previous post) I needed to cut into the thick steel boxes on the ceiling that form the 8 corners of every container. This was so that the steel "C" beams could sit flush with and support the top rails.


It took many hours and many disks to cut through, taking small chunks out at a time. The steel was 12-15mm thick in parts.

It's not pretty but it did the job!

Then it was time to put up the 1st beam.


I still need to weld the blue uprights to the container walls, and the beam to the uprights.

Whilst I was doing that, outside Paul planted a dozen rhubarb plants that he had separated from his own garden, as well as mint (after using some pier tube offcuts to form a barrier so their roots don't spread like weeds)